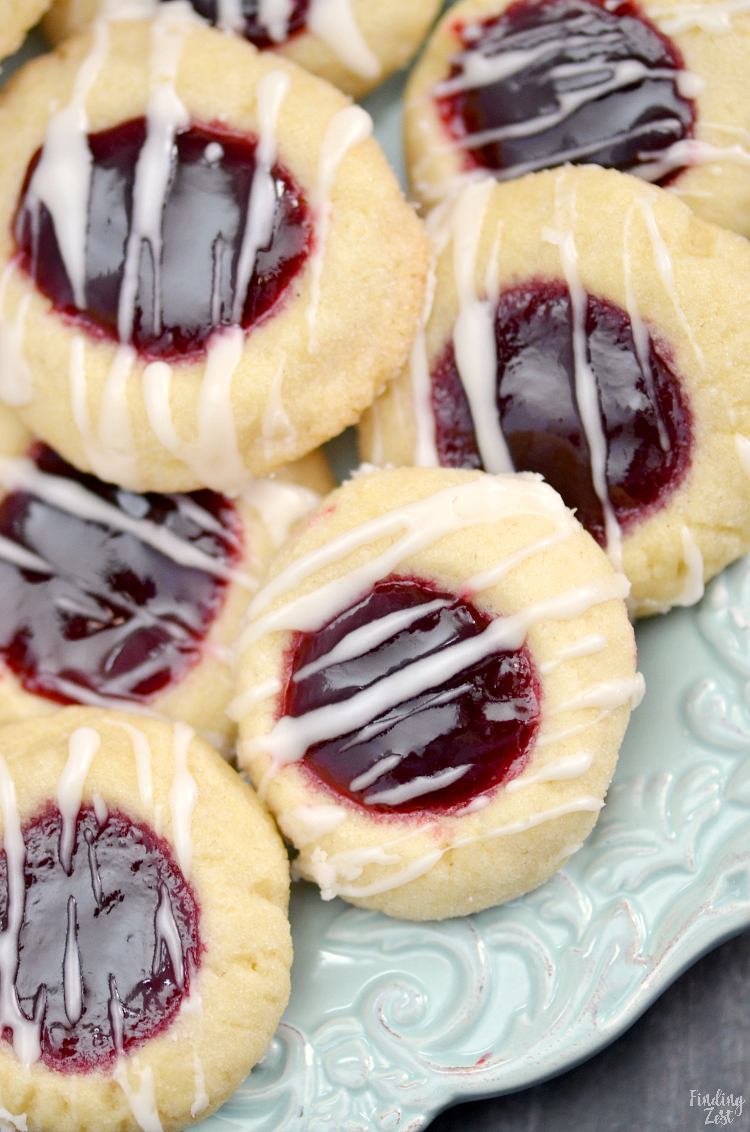
Raspberry Thumbprint Cookies with Icing
This post may contain affiliate links. Please read my Disclosure and Privacy Policy.
Raspberry thumbprint cookies are a perfect dessert for Valentine’s Day, Christmas or any time of year! Learn how to make these thumbprint cookies with icing, including the best time to add jam to your cookies. Should you add jam before, during or after baking? I’m sharing my results for this classic cookie recipe.
Last week my kids had no school for three days due to the Polar Vortex that hit the midwest, including my state of Minnesota very hard. It was the perfect opportunity to spend time in the kitchen with my mini chef Wesley. His favorite thing to make is cookies. While I love to eat cookies, I can’t actually eat them right now as I’m finishing up my Whole30 diet. That means no sugar or flour (or a host of other things) for 30 days. Making delicious jam thumbprint cookies was a special kind of torture that I’m willing to endure just for my sweet kid.
Ingredients for Raspberry Thumbprint Cookies
Not a lot of ingredients are necessary to make raspberry thumbprint cookies. If you want a true shortbread cookie all you will need is one part sugar, two parts butter and three parts flour along with raspberry jam. I’ve always liked the texture better when egg, baking powder and salt is added. For this recipe I also decided to roll my cookies in sugar before cooking and drizzled a simple vanilla icing over the top.
How to Make Thumbprint Cookies
To make thumbprint cookies you’ll need to start by creaming your room temperature butter, sugar and vanilla (or almond) extract. You’ll want to be sure to cream until nice and fluffy. This takes a couple of minutes on a mixer speed of 3 or 4. You don’t want to over beat it. Add in your egg and beat some more until it is incorporated. Stir together your flour, baking powder and salt and mix in slowly (or intervals) into your butter mixture just until combined.

Chill your dough for one hour. If you don’t chill long enough the dough can be a bit sticky and hard to work with but if you chill too long the dough can become crumbly and hard to work with.

Roll your dough into approximately inch balls. Exactly how big will affect how many cookies you get from this dough and cooking times. I was able to make 42 cookies with this recipe. Since this cookie isn’t overly sweet, I decided to roll my balls in some extra fine cane sugar. You can skip this step but it does add some nice flavor.

To make our indentations in our cookies, we used a round 1/2 teaspoon measuring spoon for even holes. You can also use your thumb, although I recommend pressing twice with your thumb on opposite sides so it is even. If your cookie develops cracks while doing this, gently press the sides back together.

Now your cookies are ready for baking! Bake at 350 degrees for approximately 13 to 16 minutes, just until the edges turn slightly golden brown.

When to Add Jam for Thumbprint Cookies
When should you add the jam to your thumbprint cookies? I wanted this question answered for myself. I’ve seen recipes call for the jam added before baking, halfway through baking, after baking and after baking with warm jam. Which way is the best? I did three batches for this recipe: before, after and after with melted jam.
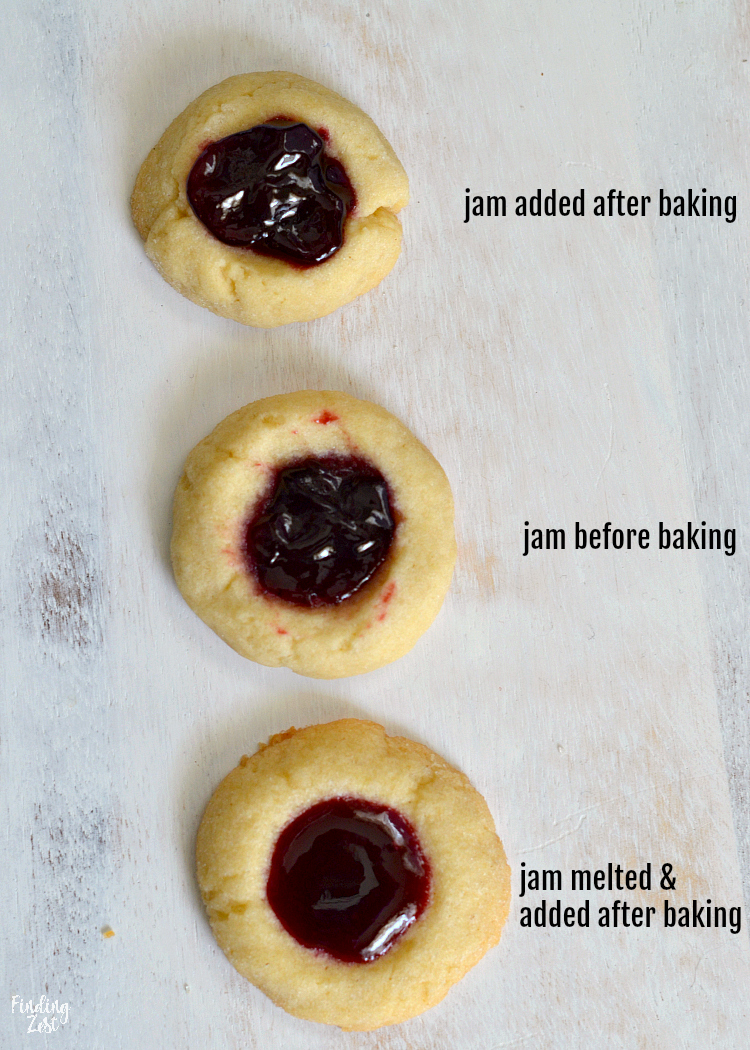
Jam Thumbprint Cookie Results:
- Adding the jam in before cooking resulted in a slightly sloppy cookie. Parts of the sides of the cookie became dyed with the jam as it spread out while baking. Small holes were created at the bottom of the cookie where the jam had melted through a bit. I thought the jam would melt to create a smooth top but it didn’t. Adding in halfway through baking would have helped with these downsides.
- Adding the jam after baking worked better, but it didn’t look as pretty. It also makes it harder to stack the cookies once cooled. It was a little awkward filling them.
- Adding warmed up jam after baking worked by far the best. Not only was it the easiest to fill just using a spoon but it created a beautiful, flat surface on top.

Adding warmed jam to already baked thumbprint cookies is so easy. I was able to fill all the cookies so much faster than when I used jam at room temperature and it created a much neater cookie.

Thumbprint Cookies with Icing
I like thumbprint cookies with icing because they really finish off the look of thumbprint cookies without nuts. They also make the cookie a bit sweeter which is nice since the cookie itself doesn’t have a lot of sugar.

I used a mini drink whisk for both mixing my icing and drizzling over the top. I like vanilla extract but if you prefer raspberry almond cookies you could replace it with almond extract.

Keep in mind that if you do add icing, over time the red raspberry jam will color the white icing red over the center.

Serve these thumbprint cookies with your favorite coffee or tea, like this honey grapefruit tea which is the perfect combination of sweet and tart. If you are enjoying this cookie as part of your holiday baking, be sure to try these Christmas Monster Cookies as well. They are so chewy and delicious!

Raspberry Thumbprint Cookies
Ingredients
- 1 cup butter softened
- 3/4 cup sugar divided
- 1 egg
- 1 teaspoon vanilla extract
- 2 cups flour
- 1 teaspoon baking powder
- 1/4 teaspoon salt
- 2/3 cup seedless raspberry jam
Icing Ingredients
- 1/2 cup confectioners' sugar
- 1/2 teaspoon vanilla extract
- 1 1/2 teaspoons water
Instructions
-
In medium bowl stir together flour, baking powder and salt. In large bowl cream butter, 1/2 cup granulated sugar, and vanilla extract. (Approximately 2 to 3 minutes on speed 3) Add the egg and beat well. Gradually beat in flour mixture. Chill dough for one hour only.
-
Preheat oven to 350°F. Line baking sheets with parchment paper or silicone baking sheets. (Alternatively you can grease your pans) Place remaining 1/4 cup of sugar in small dish. Roll dough into 1-in. balls. Roll balls into sugar and place 2 inches apart on baking sheets.
-
Using your thumb, 1/2 teaspoon rounded measuring spoon or end of a wooden spoon handle make an indentation in the center of each ball. Bake 13-16 minutes or until the edges are slightly browned. Remove to wire racks.
-
Place jam in small bowl and melt in microwave. Spoon jam into baked cookies.
-
Cool completely. To make glaze, combine combine confectioners' sugar, extract and water until well mixed. Icing should be fairly thick. Drizzle over cookies.
-
Store in airtight container in a cool place with parchment paper between layers.
Recipe Notes
You can also add jam in before baking or after baking without melting the jam, depending upon personal preference. I found that melted jam makes for a pretty presentation and is easier to stack.
Note: Over time the white icing will be tinted by the jam.
I am committed to this diet so I used the opinion of my family. According to my kids these raspberry thumbprint cookies are amazing. They found them to be buttery, flavorful and a little on the crunchy side rather than chewy. My youngest son gave it 10 out of 10, my oldest 9.5 (because he says he has to leave room just in case) and my middle son an 8 because he has a preference for chewy cookies.

Even though I’m committed, I did try one bite to test the flavor and texture before spitting it out. And man, these cookies are really good so spitting it out was HARD.
These raspberry thumbprint cookies are the perfect Valentine’s Day dessert!
![]()
I created this raspberry thumbprint cookies post to be part of a special Valentine’s Day event in its third year! We want to make a difference in the fight against pediatric cancer!
Did you know that cancer is the #1 cause of death of children by disease in the U.S.? There are 40,000 U.S. children actively battling cancer right now. With less than 4% of the National Cancer Institute’s budget going to all childhood cancer combined, I knew it was important for me to get involved.
Help us make a difference by donating to Cookies for Kids’ Cancer! Our goal is to raise at least $3000. Because these three companies: Dixie Crystals, Mediavine and OXO have each pledged to match our donations raised through this campaign up to $3000!
Thanks to many of you, we have reached our goal. You can still donate and help us make an even bigger difference!
Valentine’s Day Desserts
Check out all of the other amazing Valentine’s Day dessert recipes from other bloggers participating.
- Chocolate Chip Cookie Cake from Julie of The Little Kitchen
- White Cake Mix Cookies from Courtney’s Sweets
- Læsø Salted Chocolate Chip Cookies from Camilla of Culinary Adventures with Camilla
- Meyer Lemon Cookies from Linda of Simply Healthyish Recipes
- Soft & Chewy Gluten Free Oatmeal Raisin Cookies from Allie of Miss Allie’s Kitchen
- Small Batch Bakery Style Chocolate Chip Cookies Recipe from Faith of An Edible Mosaic
- Chocolate Madeleines from Caroline of Caroline’s Cooking
- Rainbow Rice Krispie Treats from Bree of Baked Bree
- Tiger Butter Candy from Melissa of MamaGourmand
- Valentine’s Day Gluten Free Sugar Cookies from Brianna of Flippin’ Delicious
- Chocolate Spritz Sandwich Cookies from Carlee of Cooking With Carlee
- Pink Velvet Chocolate Chip Cookies from Jenn of Ever After in the Woods
- French Butter Cookies from Rebekah of Kitchen Gidget
- Brown Sugar M&M Cookies from Sara of Imperfectly Balanced Sara
- mini rose cookies from Meaghan of the decorated cookie
- Raspberry Linzer Cookies from Stephie of Stephie Cooks
- Red Velvet Brownies with White Chocolate Cream Cheese Frosting from Coleen of The Redhead Baker
- Lemon Poppyseed Cookies from Becca of Two Places at Once
- Warn Dark Chocolate Melting Cups from Lisa of Snack Girl
- Salted Dark Chocolate Cookies from Jessica of A Kitchen Addiction
- Cherry Cordial Bundt Cake from Carolann of Apron Warrior
- Nutella Stuffed Cookies from Allison of Celebrating Sweets
- Strawberry Pudding Cookies from Holly of A Baker’s House
- Slice and Bake Whirligig Cookies from Laura of Untwisted Vintage
- Raspberry Strawberry Cookies from Heather of Delicious Not Gorgeous
- Chocolate Strawberry Hand Pie from Trang of Wild Wild Whisk
- White Chocolate Cashew Cranberry Cookies from Brittany of Diary of a Southern Mrs.
- The Best Potato Chip Cookies Recipe from Marybeth of Babysavers
- Darth Vader Valentine’s Day Hug Cookies to Support Cookies for Kid’s Cancer from Jenn of justJENN recipes
- Hazelnut Shortbread Cookies with Jam from Lisa of Garlic & Zest
- Sprinkled Chocolate Shortbread Heart Cookies from Lisa of Blogghetti
- Double Chocolate Chip Cookies from Dee of Meatloaf and Melodrama
- Homemade Salted Nut Rolls from Shaina of Food for My Family
- Valentine Sugar Cookie Cups from Melissa of Persnickety Plates
- Chocolate Dipped Cashew Butter Cookies from Ashley of Fit Mitten Kitchen
- Chocolate Vanilla Striped Shortbread Cookies from Denise of Chez Us
- Pineapple Coconut Bar Cookies from Barbara of Barbara Bakes
- Chocolate Raspberry Roll-Ups from Sue of It’s Okay to Eat the Cupcake
- Raspberry and Rose Meringue Parfaits from Michelle of Cup of Zest
- Chocolate Chip Pudding Cookies from Jade of Jonesin’ For Taste
- Chocolate Mousse Cups from Miranda of Cookie Dough and Oven Mitt
- Grain-Free Dark Chocolate Raspberry Tart from Gretchen of kumquat
- Chocolate Shortbread Cookies from Sara of My Imperfect Kitchen
- Chocolate Chip Cookie Pie from Angela of About A Mom
- Honey Pistachio Shortbread from Megan of Stetted
- Red Velvet Oreo Cheesecake Cookies from Nicole of For the Love of Food
- Chewy Coconut Macaroon Hearts (Gluten Free) from Taryn of Hot Pan Kitchen
- Chocolate Peanut Butter Valentine’s Cookies from Becca of The Salted Cookie
- Chocolate Caramel Pie from Stefanie of Mommy Musings
- Gluten-Free Red Velvet Brownies {Dairy-Free} from Audrey of Mama Knows Gluten Free
- Chocolate Raspberry Cupcakes from Erica of The Crumby Kitchen
- Dark Chocolate Bourbon Coconut Cream Mousse from Lisa of Taste Cook Sip
- Maple Butter Chocolate Chip Cookies from Jamie of Southern Revivals
- Red Velvet Mini Layer Cakes from Gwynn of Swirls of Flavor
- The Best Potato Chip Cookies Recipe from Marybeth of babysavers
- Brown Butter Chocolate Chip Cookies from Kara of Kara in the Kitchen
- Brown Sugar Snickerdoodles from Kristin of On the Home Front
- Valentine’s Gummy Hearts from April of April Golightly
- Cocoa Sweet Dough Hearts from TammyJo of The Chocolate Cult
- Heart-Shaped Sugar Cookie Cutouts from Susannah of Feast + West
- Cranberry Pecan Oatmeal Cookies from Denise of addicted 2 recipes
- Shortbread Cookie Recipe from Raquel of Organized Island

 /div>
/div>
Emilie, You are wonderful for creating and sharing this lovely recipe for such a worthy cause!
Your Mediavine swag should have arrived recently. It’s just a small token of our appreciation for your time and efforts to wipe out pediatric cancer.
— Susannah at Mediavine
Wow, what a beautiful recipe! From the bottom of my heart, thank you for participating in our V-Day event and driving awareness to C4KC’s mission!
The recipe taste / quality is great!
The quantity was way off for me. I was only able to get 20 cookies from this recipe. I rolled out 1” balls, and couldn’t get anywhere near 42 cookies.
Also, for the glaze, with the powdered sugar ratio, it took about 2 TBS water to get the thick glazed consistency.
The note about the jam being added warmed, after baking was a huge help! These turned out great for my Christmas cookie exchange.
Sorry you didn’t get as many cookies. The size is definitely approximate and perhaps I didn’t make full one inch balls or yours were bigger than one inch. 🙂 I’m happy you enjoyed the taste and the jam options included in the post. Hope you had fun at your cookie exchange!
can you freeze these cookies
Yes, you can freeze thumbprint cookies by placing them in a single layer between parchment paper in an airtight container or resealable plastic bag. Best to use within three month. Bring to room temperature to defrost. Also works to freeze the dough in ball form as well!
I was just wondering if anyone else experienced the indentations filling up as they baked. After I remove them from the oven I just used my half teaspoon once more to make the indentation again. I found them to have spread quit a bit even when I put them back in the fridge after I formed them. I have never really had much luck with thumbprint cookies. I just can’t seem to get it right. I think maybe I over baked them a little bit because even though the bottoms were lightly golden brown they were crumbly when I bit into it. Any pointers would be appreciated!
Thank you Emilie ????
I’m so sorry to hear you had issues with spreading. Adding the indentation again after they came out of the oven was a great idea! It is hard to know what might be causing it but some common culprits are beating the dough for too long, not refrigerating the dough long enough or it warming up too much before they go into the oven, adding butter or cooking spray to the bottom of your pan (a silicone baking sheet or parchment paper will prevent this) not using room temperature pans for each batch. I’m not sure if any of these are the reason they spread on you, but they are my best guesses.
Thanks for trying the recipe and for taking the time to comment! Best of luck to you next time! 🙂
Just wondering, would it help to put the jam in a frosting bag?
Perhaps if you warmed the jam first it would be helpful but I found just using a spoon was pretty easy with warm jam. If you add cold or room temperature jam, I don’t think it would work well. A piping bag is so helpful for smooth fillings, frostings and melted items like chocolate or caramel. But jam is pretty thick and can have clumps. Hope I’m making sense. Thanks for your question! 🙂
I made these today. I added almond extract to dough. I also had an issue with the well for the jam during baking but halfway thru I dented them again and it was fine. I don’t think the extra sugar is necessary, I opted out on the glaze and used powdered sugar. Very good!
I made these at Christmas 2022. I found that the raspberry jam I used was like no flavor just sweet so I used a seeded jam which was more flavor and simply fruit. The cookie them themselves when I refrigerated the dough it was way to hard to roll into balls. I found the dough needed to be at room temperature. My second batch I made I rolled into ball and sugar right away then I put in fridge. Then I baked half way did the thumbprint and filled with heated jam and used like a picnic ketchup bottle so it was not messy. They turned out perfect. I also made a variation and added a caramel center rolled in pecans and topped with chocolate..
Great ideas!!! Love the ketchup bottle trick! Will have to try that. 🙂
Thank you for this recipe! Sooo good. My family of 6 all agree that these are the best.
We discovered your recipe last year…and love it! everyone is asking for the recipe and thoroughly enjoys these (they don’t last long around our house!)
I’m so happy to hear that everyone enjoys them so much! Made my day. 🙂