Frozen Flubber Craft Tutorial with Elmer’s Classic Glitter Glue
This post may contain affiliate links. Please read my Disclosure and Privacy Policy.
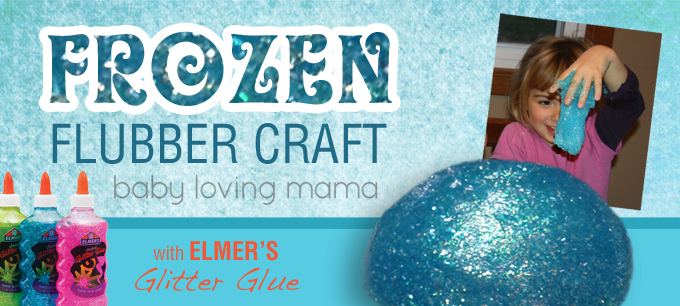
My best friend, Anna, and her beautiful daughter, Caitlin, came to visit recently and we were in need of some fun and simple crafts for our two artsy girls. I stumbled upon a cool tutorial for Frozen “Silly Putty” on another great mom blogger site. This post is all over Pinterest right now. Having just bought a bottle of Elmer’s Classic Glitter Glue I thought I could simplify the recipe for an even easier craft experiment for your little ones. Elmer’s asked me to share this Frozen Flubber craft tutorial as part of their Early Learners Academy campaign.
INGREDIENTS:
It doesn’t get much easier than this crafty parents. You need three ingredients. This is a two step mixing process.
Bowl 1:
1 bottle of Elmer’s Classic Glitter Glue (blue for our Frozen inspired craft) (177ml)
The same amount of water (177 ml)
Bowl 2:,
1/2 teaspoon of Borax (I bought this huge box from Walmart in the cleaning section for less than $5)
1/2 cup hot water

I’d suggest using either two glass bowls which can be washed well with hot water or in the dishwasher to sterilize since we’re using borax for this craft. OR you could use a disposable plaster or paper bowl. We also used disposable spoons.
The girls were busy playing dress-up (hence my daughter’s colorful outfit! ha ha ha) and they came running at the news of a Frozen inspired craft!
STEPS TO MAKE FROZEN FLUBBER:

Pour all of your Elmer’s Glitter Glue into bowl #1.

Fill your empty glue bottle with the same amount of water and pour into the same bowl #1.

Put 1/2 cup of HOT water into bowl #2. Have an adult help measure 1/2 teaspoon of borax.

Have an adult help add the 1/2 teaspoon of borax into the 1/2 cup of hot water in bowl #2.

Stir well until dissolved.

Pour the water/borax from bowl #2 into the glue/water bowl #1.

Mix well and watch the magic happen!

The glue starts to lump together as you mix.

Pull the blue, glittery glob from your water. Dispose of water.

Work the “Flubber” until all of the moisture is worked in. (This is not at all like putty to me so I’ve renamed it flubber – it’s like a stretchy gel and is dry to the touch if it’s well-played with but slimy to the touch at first).

As you work with the flubber it gets less sticky and more of a slippery gel-like ball.

The more you work with it the more flexible it becomes. We stretched ours to great lengths.
MORE FUN IDEAS:
- Flatten a section of your flubber and work it gently until you have a glittery window… when it’s really thin blow through it and you make a big bubble!
- Make a round ball. Set it on the table and watch it slowly flatten into a puddle.
- Make a small ball and watch it bounce on the table.
- Do you wanna build a snowman? Watch your snowman meeelllt down, down, down. (Some people are worth melting for.)
- Break into pieces and share with your siblings, friends or mom and dad! Yes, Anna and I had just as much fun (ok maybe more) with this flubber as the girls did.
- Break into small balls and package into little plastic containers for party favors.
- Store your flubber in a plastic lunch bag or container and return days later for fun (some mixing with your hands required – expect a bit of slime at first).
PIN IT:
Please share with your friends on Pinterest!

BUY IT:
I found my Elmer’s Classic Glitter Glue at my local Target store for $2.99.
Disclosure: This Frozen Flubber post is sponsored by Elmer’s Early Learners Academy. All thoughts and opinions are my own.
we plan on making snowflakes
My son like to make snowflakes
I love doing craft things with the grand daughters – we have so much fun!
We last make necklaces.
thank you
My daughter and I have been making snowflakes.
We have been making Christmas ornaments with recycled Christmas cards
We are going to make some snowflakes and hang them on the windows.
We will do some ornaments and an advent calendar.
Thank you for the chance to win.
We are planning on making some handprint ornaments that look like reindeers!
We’re going to be cutting and decorating snowflakes!
My girls would love this. I enjoy doing crafts with my kids because it is so much fun and I am spending wonderful time with them. THank you!
We are planing to make Christmas ornaments
I don’t have anything planned but I am going to pin this because it will be something that is easy and will keep dd and my nieces occupied for a good while! We need them occupied so we can get the Christmas/New Year’s baking done when my sister is here!
Oh, my daughter is going to love this one! I love watching her create when we do crafts together, even if that means the snowman has 15 googly eyes, lol!
We are going to do handprint sweatshirts, they make really good gifts for grandparents.
What I love about doing arts and crafts projects with my grandson is seeing his face light up at his finished product in the end. I love watching him come up with creative ideas, too!
I love doing crafts projects with my kids because it gives them all something to focus on, and it lets them work together without too much fussing. It’s awesome to see what they come up with.
We Plan On Making Ornaments And Cards With The Kids. We Love Holiday Crafts!
I’m not very crafty, but we do bake like crazy!
Popsicle stick ornaments.
My daughter is making Christmas ornaments for the grandparents