Mermaid Jar Light: Unicorn Spit Project
This post may contain affiliate links. Please read my Disclosure and Privacy Policy.
Thank you to Eclectic Products Inc for sponsoring this mermaid jar light, a fun Unicorn Spit on glass project!
It is no secret that I love sharing mermaid crafts and making delicious mermaid food! Check out my mermaid party ideas section and you’ll see what I mean. So when I was approached about a partnership with Unicorn Spit to create a DIY project with their product, I thought this gel stain and glaze would be perfect for creating a gorgeous mermaid jar light. I am so happy with how it turned out. Read on to see exactly how I brought my vision to life! 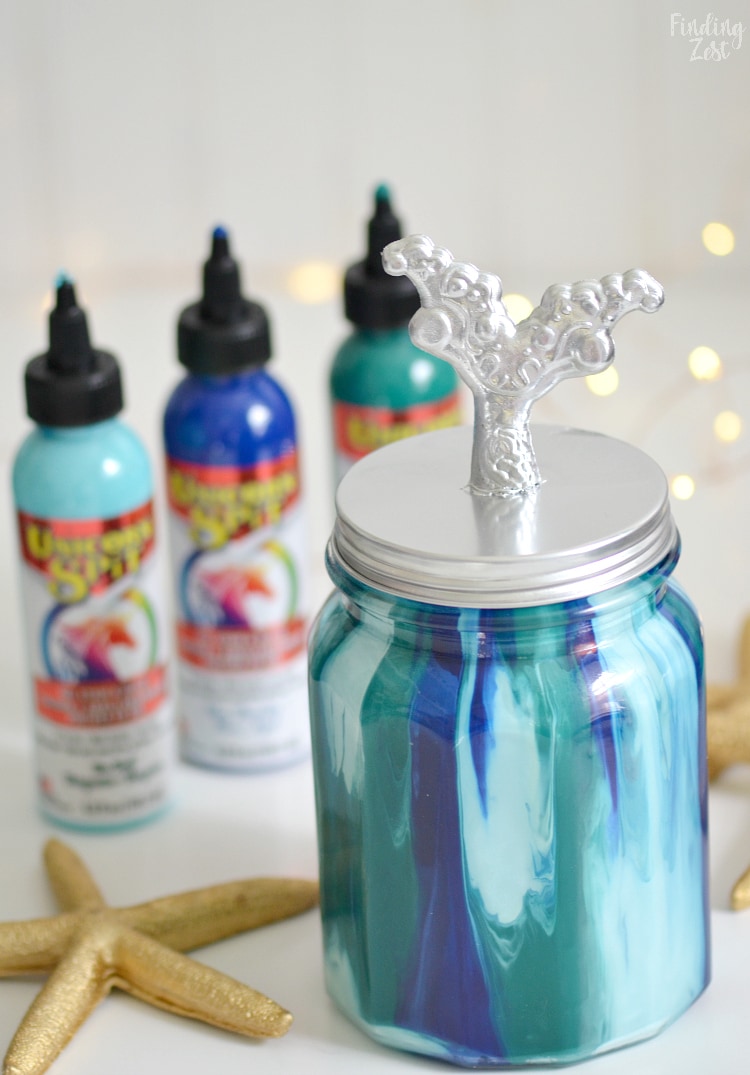
What is Unicorn Spit?
Unicorn Spit is a gel stain and glaze. The product is very versatile and can be used as a paint or diluted with water to create a gel, glaze, stain, white wash or antiquing tint! Unicorn Spit can penetrate a wood grain or glaze over your existing finishes. Not only can it be used on wood and glass, but Unicorn Spit also works on plastic, metal, fabric, concrete, wicker and more! Pretty cool, right? You can find it 4 oz and 8 oz bottles in a wide variety of colors. Bonus that it is non-toxic and made in the USA.

Mermaid Jar Light Supplies
To make this Unicorn Spit on glass project, you’ll need the following supplies:
- glass jar (new or cleaned well)
- mermaid doll with plastic tail, resin starfish, resin mermaid tails or small mermaid figurine
- Unicorn Spit in Navajo Jewel, Blue Thunder and Zia Teal
- glue gun
- spray bottle with water
- polyurethane spray
- metallic spray paint (or other favorite color)
- fairy lights
Would you believe I used dollar store items to make this unicorn spit on glass project? The glass jar and mermaid doll I picked up at my local Dollar Tree and they got a full makeover!
How to Make a Mermaid Jar Light
This project is fairly quick to make but will require plenty of drying time. Starting with a clean and dry glass jar, squirt Unicorn Spit randomly within the jar. I tried to create short streaks down the side and a few bigger drops in the center of the jar. I then misted 6 to 8 times with my water bottle to thin the glaze a bit and turned it upside down. I recommend letting it sit like this for several hours. Keep in mind that the ending result will be much different once it has a chance to drip down. If you find that it doesn’t have enough coverage you can add more and repeat the process.

While your jar is drying it is the perfect time to make your mermaid tail lid. I got lucky and found this mermaid doll at the dollar store but you could always substitute small resin figurines, mermaid tails or starfish.

I cut off the end of the mermaid tail with sharp scissors used a hot glue gun to secure it to the top of my lid. If you add a bit of extra glue you can make it look even more like the tail is coming out of the water.

I then spray painted the lid and tail with brilliant aluminum metallic spray paint. Originally I was going to use a glitter spray paint but my nozzle clogged and not even some mineral spirits could unclog it. Thankfully I had this metallic spray paint on hand. It worked great!

Once your glass jar has had a chance to fully dry you’ll want to add a few coats of polyurethane to the inside only of your jar. This is to protect your glaze so if it comes in contact with water it doesn’t start dripping again. I covered the outside with a plastic bag before spraying the inside of my jar. Be sure to take this step outdoors because the fumes are quite strong.

Of course a mermaid jar light needs a light source. You can find several tea light options at a dollar store that would work but I wanted to use fairy lights. They are very inexpensive and can be ordered online.

Cover your jar with your fully dry mermaid tail lid. I love how the lid really finishes off the look.

I wasn’t sure how well the Unicorn Spit would reflect the light but the light shines through for all the colors. Isn’t it pretty??

Trying different techniques with Unicorn Spit is fun. No two projects will turn out the same using this technique. Because I wasn’t sure what methods I would like best, I made two different jars. My instructions above are for the version on the right, which is by far my favorite jar.

What did I do differently?
Left Mermaid Jar: Less Unicorn Spit with smaller drops. Upside down for 1 to 2 hours. Tail spray painted then glued to lid. Lid was not spray painted.
Right Mermaid Jar: More unicorn spit with longer squirts. Upside down for several hours. Tail glued to lid then tail and lid spray painted.
Unicorn Spit on Glass Tip:
If you need to speed up the drying process you can place your glass jar in the oven at 350 degrees for around 10 minutes. (Be careful when you remove it as it will be very hot!) However, this can not be used to speed up the drip process. Once you place it in the oven the dripping will stop so don’t do that until you like the look of your jar. I was amazed how much my jar changed for the better over the course of several hours.
Mermaid Jar Light Video Instructions
Watch me step by step as I create my mermaid jar light in this handy video!
Where to Buy Unicorn Spit
You can use the store locator to find Unicorn Spit Retailers including Amazon, home improvement stores like Home Depot and Lowes and craft stores such as Joann Fabrics or Michaels.

I can’t wait to tackle more projects with Unicorn Spit. Give it a try and create your own masterpieces!


Amazing! I love it! I just discovered unicorn spit and it’s insain how much can be done with it. Normally my Pinterest projects we major flops ? but since unicorn spit and this new amazing jar idea OMGAWD. SO FANTASTIC! My husband thought I made them to sell lolol NOPE!!!! They light up my home and my life. Great to give as gifts. My whole family has received them and love them! And talk about the amazing stress and anxiety relief. It’s impossible to be in a bad or sad mood while doing these. Thank you!