Turkey Tablescape Craft Tutorials + Joann Fabrics 50% OFF COUPON #turkeytablescapes
This post may contain affiliate links. Please read my Disclosure and Privacy Policy.
![]()
Although our family makes it a priority to eat dinner together at the table nearly every night (a tradition I grew up with), it’s rarely fancy. However there are a few special times of the year when I get to pull out the nice china. Those beautiful white dishes that I painstakingly picked out for our wedding registry rarely get used.
 Thanksgiving is about family and togetherness and of course being thankful for our blessings, but it’s also very much about those comfort foods and traditions. What better reason to set a beautiful table to welcome your family this year. You’ll find tutorials below for each aspect of this beautiful “turkey tablescape” including the centerpiece, the banner, the place cards and the no-sew tablecloth. Don’t miss the 50% off coupon from Joann Fabric and Craft Stores® at the end!
MATERIALS: Centerpiece
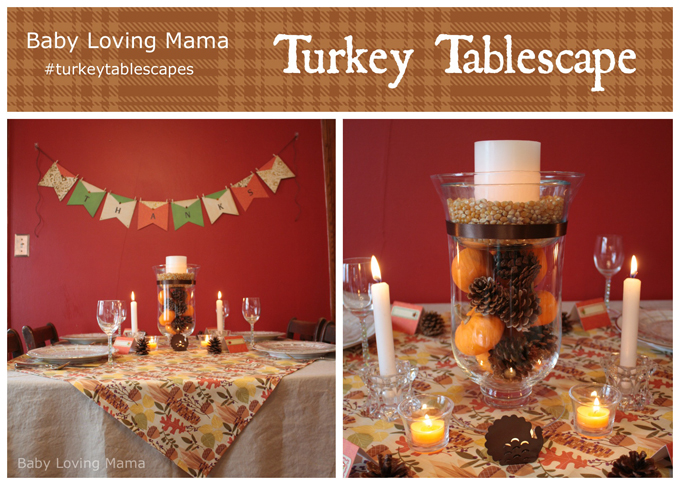
- Large glass vase
- Glass bowl that rests inside the vase
- Small pumpkins
- Popcorn seeds
- Pinecones
- Ribbon
- Flameless wax candle
- Tulip Fabric Spray Glitter
- Double-side tape or adhesive
Set pinecones on a newspaper or any protected surface and spray with Tulip Fabric Spray Glitter. Set aside to dry. I wasn’t sure how much the fabric glitter would show up but it was stunning! It gave the perfect amount of shimmer without looking tacky. I can’t wait to use these for Christmas as well.
Once dry, layer the glittery pinecones with your mini pumpkins into the large vase. Fill your second glass dish with popcorn seeds set around your flameless wax candle. Tie a ribbon around the “seam” where the bottom of the inset bowl is visible. Tack ribbon to vase with a piece of double-side tape or adhesive (I used the little piece of tape from the roll of ribbon).
Optional: Add candles in varying heights around your centerpiece to add depth and interest.

MATERIALS: Banner
- Decorative papers (scrapbook papers)
- Beads in a Bottle
- Dark brown twine
- Command mini clear hooks
- Mini clothespins
- Mini leaf buttons (or any Thanksgiving embellishment)
- Scissors and Paper trimmer (optional)
- Tacky glue or adhesive for button embellishment
- Alphabet letter stickers
Choose your papers. Mine were from this gorgeous orchard 12″x12″ scrapbook paper stack. I love the golden accents. Using your paper trimmer, measure and cut eight 6″x6″ squares (or however many squares you need to spell your word or fill the width of your space if you chose not to use a word). Measure up about 2-3″ and mark the center horizontally. Cut from your corner to the center mark from both sides removing a triangular slice from the bottom of your square. *SAVE this triangular piece. Arrange your papers in the order you prefer and place that triangular piece along the top of a different colored/patterned banner square to add interest (this is of course optional if you prefer it without).
Embellish your banner how you’d like! I added a mini button leaf at the point of the triangular piece, added Beads in a Bottle dots on the points of each banner piece and found large scrapbook letters to spell the word “THANKS”. Measure your twine for the space you’d like to hang your banner and attach each banner piece with your mini clothespins. I didn’t adhere them in any way so I can take this down and reuse the elements as I’d like.
Fasten the banner to the wall with masking tape temporarily to ensure you like the height and spacing. Adhere your Command mini clear hooks for a temporary place to hang your banner which can be safely removed when you’re finished.

MATERIALS: Place Card & No-Sew Tablecloth
- Decorative papers (scrapbook papers)
- Thanksgiving stickers or embellishments
- Tacky glue or adhesive
- Autumn fabric of your choice (1 yard or desired size for your table)
- Fabric adhesive pen
- Scissors
Cut and fold a small piece of card stock or scrapbook paper in half to serve as a place card for each of your guests. Decorate each card with a simple tag (mine were from this orchard 12″x12″ scrapbook paper stack). Add a sticker or embellish however you’d like. Include your guests’ names on the card and encourage them to write what they’re thankful for on their card. Share your notes as a family or save them for a scrapbook or memory album.
If you’re pressed for time, aren’t feeling crafty, or hate to sew, consider this quick and easy no-sew tablecloth to transform your table this holiday season. Chose a fabric that best fits your decor and season in as little as one yard (or even less if you want to do a runner). Simply iron, fold over half an inch on each edge and iron flat all the way around. Use a fabric adhesive pen to permanently glue down the edges and let dry. Set your fabric at an angle on the table layered over a solid colored tablecloth and you’ve added a huge pop of interest instantly with very little cost.

For more holiday craft ideas be sure to check out the ! The beautifully decorated letters on the bottom of page 13 look a lot like my decoupage tutorial from Halloween. Check it out for tips on how to achieve this look for your holiday or winter decorating.

Disclosure: This post is part of the JoAnn Fabric and Craft Stores® Celebrate the Seasons campaign. I received compensation for this review; however, this is my personal, honest opinion based on my experience.
My gf works at Jo-Ann. We always do crafts together, this tabletop looks perfect for something we can do when its Thanksgiving!
Thanks for the great post !!!
You could use other kinds of seed/beans in place of the popcorn. Nice centerpiece.
That is a beautiful centerpiece you made, really like this. I am not at all crafty and anything I try doesn’t turnout like this but I really love it
I love the pine cones such a nice fall touch..great diy ideas.
You can find everything at Jo Ann’s. I especially like the idea of using popcorn in the centerpiece.
These are some really nice ideas–Thanksgiving is my favorite holiday!