Halloween Charcuterie Board (with Edible Skull)
This post may contain affiliate links. Please read my Disclosure and Privacy Policy.
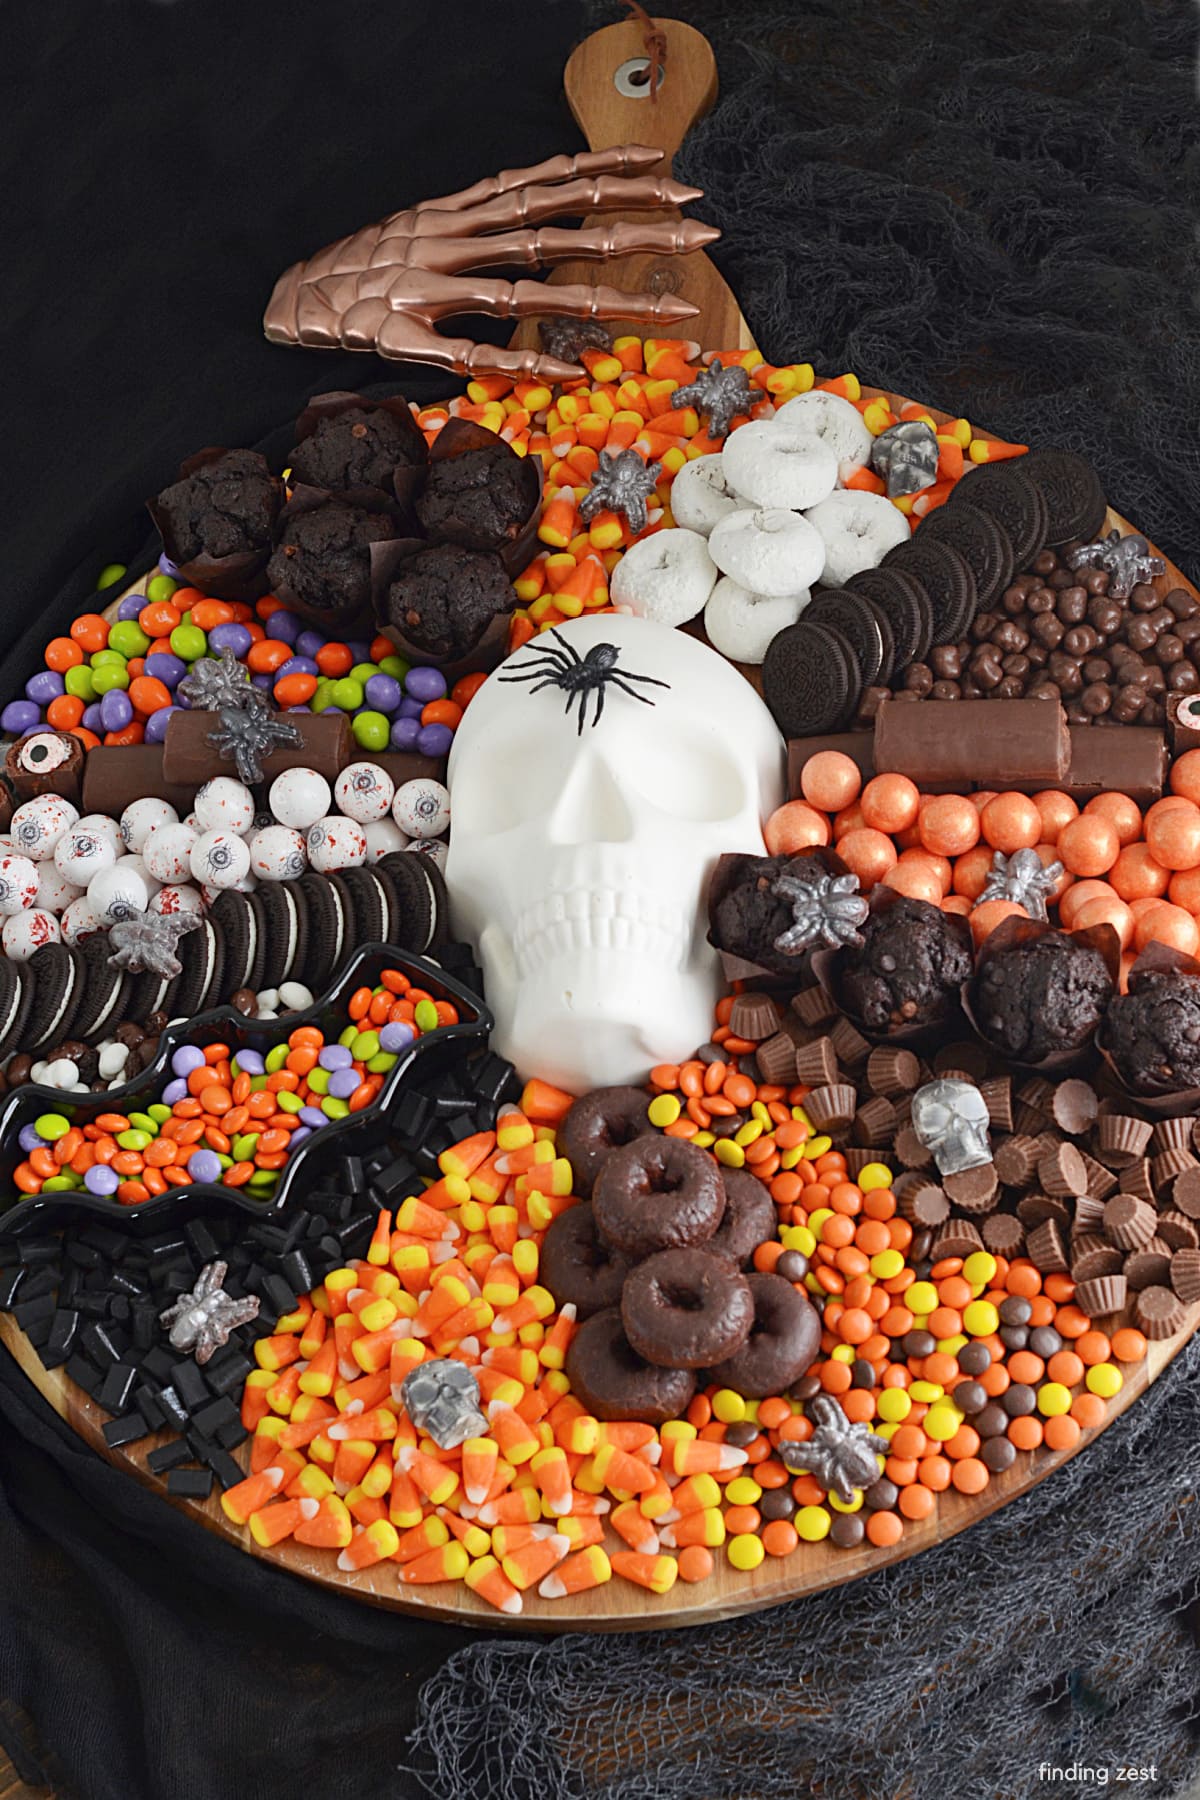
This Halloween Charcuterie Board is the perfect Halloween party treat! This dessert board features a chocolate skull centerpiece along with plenty of candy and other delicious sweet treats for guests to enjoy. Get step-by-step instructions to create the 2D chocolate skull that really makes this charcuterie board stand out. It is sure to be a hit at your next Halloween bash!
Halloween is a favorite time of year with so many ways to make decorating and recipes so much fun! My kids love spooky treats like bloody popcorn and graveyard pudding. But this year I really impressed them with this Halloween candy charcuterie board. Loaded with sweet treats and various candy, it is quite simple to put together and I will show you how!

Halloween Dessert Board Ingredients
To make this Halloween dessert charcuterie board you’ll need some basic ingredients and supplies. It is entirely customizable for what you have on hand or personal preferences but these are what I used to make the skull board as shown.
Chocolate Skull:
- bright white candy melts (as shown) or your favorite chocolate
- canola oil or shortening (optional)
- 3D skull chocolate mold (Is this currently out of stock? Try this skull mold or search for “skull 3d mold” to find more sellers! You can also use this mold for this skull cheese ball!)
Chocolate Spiders and Skulls:
- chocolate chips (milk chocolate, dark chocolate or semi-sweet chocolate) or black candy melts
- edible dust (optional) in black or metallic colors
- edible food brush (optional)
- spider mold
- skull ice cube mold
- bright white candy melts

Charcuterie Board:
I used a wood charcuterie board that I had on hand that is 22 inches round. Because the skull is rather large, I don’t recommend too small of a board. At least 16 inches wide would work best if you are going to include the skull head so you have space on the sides. I purchased my board several years ago at T.J. Maxx so I can’t find the exact one I’ve used here. I also used this same size for my breakfast charcuterie board. It is very versatile.
Here are some charcuterie board options:
Baked Goods Featured:
- triple chocolate muffins
- powdered donuts
- chocolate donuts
- Swiss Cake Rolls
- Oreo cookies
All of these baked good I purchased at my local Walmart but you could make homemade treats like spider donuts or include semi-homemade fillers like these monster marshmallows or witches broom candy.
Candy Featured:
- Reese’s Pieces (9.9 oz)
- Reese’s Peanut Butter Cups Mini Unwrapped (7.6 oz)
- Brach’s Candy Corn 16.2 oz
- M&M Candies Ghoul’s Mix
- M&M Candies Peanut Ghoul’s Mix
- black and white trail mix (38oz)
- Nibs Black Licorice (6 oz)
- Cookie Dough Bites (4 oz)
- bloody eyeball gumballs
- orange gumballs
Keep in mind that many of these candies can be purchased locally for much cheaper. Your local dollar store can be a great option for getting cheap candy options for this charcuterie board! You want a wide variety of sizes and textures. Consider if you want to follow a certain color scheme or use a wide variety. I decided I wanted a lot of traditional Halloween colors with plenty of black, white and dark brown mixed in.
How to Make a Chocolate Skull
This large chocolate skull is made from a 3D skull chocolate mold. And while a 3D skull would be cool for this dessert board, I wanted to see the skull from overhead and design around it. So this project uses just uses half of the mold to create a 2D chocolate skull.

For this skull you’ll need a full bag (12 oz) of bright white candy melts, or whatever color you prefer. In a small microwave safe bowl, melt a little over half the bag of candy melts. Melt in short 15-30 second intervals, stirring often. Do not over cook. Stir in a teaspoon of canola oil or shortening to smooth out the candy.

Pour the melted candy melts into the face side of the giant skull mold. Spread out evenly, making sure you get all the way to the top and around the edges. Gently tap on a hard surface to remove air bubbles. Transfer to a baking sheet to keep your skull level and place in the fridge for approximately 30 minutes to set.

Repeat the process with the remaining candy melts to create a second layer of candy melts. This will make your chocolate skull more sturdy and fill in any thin spots you might have had in the first layer.

Refrigerate for an additional 30 minutes or until fully set.

To remove your skull, gently pull all edges of the silicone mold away from the candy skull. Gently turn over on a flat surface and lift back the silicone all the way. You’ll be surprise how easy it is to remove. The mold is really great quality for the price!

You’ll notice the edges are not exactly even or perfect and that is ok! We can fix that. Any imperfections on the face of the skull seems more realistic so I was happy to see a few on mine.

How to Smooth Edges of Chocolate Skull
Heat up a large skillet on low to medium low heat. You don’t need it very hot, just enough to slightly melt the edges. Place your skull face up on the skillet and watch it carefully. Remove it when your edges have become level. This should not take long at all. Maybe 30 seconds or less, depending upon how much your pan has heated up.

Turn your skull over and wipe along the top edge with a paper towel, or gloved hand to smooth it out. Store your skull in a gallon sized ziploc bag until you are ready to use. I stored mine at room temperature, however it was not hot or humid. You can store your skull in the refrigerator if you prefer, especially if your kitchen is warm.

How to Make Chocolate Spiders
Chocolate spiders are so easy to make yourself and make a great addition to this spooky Halloween charcuterie board. You’ll need a spider mold like this one I found on Amazon. In a small microwave safe bowl, melt approximately 1 cup of your favorite chocolate chips in short 15-30 second intervals, stirring often. Do not over cook chocolate.

Using a spoon, carefully drop chocolate in plastic mold, carefully filling to the top but not overflowing. It helps to add to the center and gently push out to the edges, making sure to get all crevices. Gently tap the mold against a hard surface to remove air bubbles. If you have a lot of excess you can level the backs with the flat edge of metal spatula. Place in the refrigerator for about 15 minutes to fully harden before gently removing.

You can leave these chocolate spiders as they are or you can add some sparkle with some edible dust shimmer powder. Since I used milk chocolate, I decided I wanted a darker spider and opted to add some various edible dusts.

I especially love how the black dust turned out the best but you can play around with other metallic colors including gold and silver like I did below, blending with an edible food brush as much as you’d like.

I repeated this same process with these white skulls using white candy melts, an ice mold and black dust.

How to Make a Charcuterie Board
To make this charcuterie board for Halloween, you’ll want to gather all of your ingredients. If you are using a board without sides, I recommended building it where you plan to serve it if possible. Moving it around a lot is difficult, especially with the smaller candies that can roll off the sides.

I wanted the chocolate skull to be the focal point so I placed it in the center of my board. I added the larger baked items first, which helps to hold in any of the smaller candy items.

While smaller dishes aren’t a must, they add a nice texture, help to hold smaller items and break up the space a bit. I have a smaller black bat serving dish which worked perfectly to hold my M&M candies. Then I filled in black and white trail mix and black licorice along the sides. This dish is another item I picked up years ago at T.J. Maxx but any smaller dish will work that fits your color scheme.

I played around with how I placed my items. moving things as I went. I tried to add more visual interest with small touches, like cutting a Swiss Cake Roll and adding some bloodshot candy eyes to the top.

Adding the chocolate spiders and chocolate skulls throughout the board and a black plastic spider to the skull head was a nice finishing touch. My youngest son liked the idea of using the bloody eyeball gumballs in the eye sockets of the chocolate skull but you can also fill with smaller candies or brush that area with edible dust. You can choose to fill your 2D chocolate skull with goodies and break before eating with a small mallet, or just use it as a an amazing skull centerpiece as I did. I finished off the dessert board with a metallic skeleton hand that I had left over from this Dollar Tree Halloween decor DIY and placed some black creepy cloth around it.

How to Build a Dessert Charcuterie Board
To summarize these steps, you’ll want to do the following:
- Choose the perfect theme and color scheme
- Gather your favorite candies and sweet treats in various sizes, colors, and textures
- Place your centerpiece down to build around it
- Add your bigger items in various ways (small stacks, rows, build piles, etc) and any bowls/serving dishes
- Place remaining treats, filling in any gaps with smallest items. Fill your serving dishes.
- Add finishing touches such as small candies in various shapes and decor around the charcuterie board
Serve this dessert board with your favorite Halloween drinks, like this green Halloween punch or this pumpkin juice recipe.

Halloween Charcuterie Board
Ingredients
- 2 bags (12 oz) bright white candy melts
- 1 cup chocolate chips milk chocolate, dark chocolate or semi-sweet chocolate or black candy melts
- canola oil or shortening optional
- edible dust optional in black or metallic colors
- triple chocolate muffins
- powdered donuts
- chocolate donuts
- Swiss Cake Rolls
- Oreo cookies
- Reese's Pieces 9.9 oz
- Reese's Peanut Butter Cups Mini Unwrapped 7.6 oz
- Brach's Candy Corn 16.2 oz
- M&M Candies Ghoul's Mix
- M&M Candies Peanut Ghoul's Mix
- black and white trail mix 38oz
- Nibs Black Licorice 6 oz
- Cookie Dough Bites 4 oz
- bloody eyeball gumballs
- orange gumballs
Instructions
How to Make a Chocolate Skull
-
In a small microwave safe bowl, melt a little over half the bag of candy melts.
-
Melt in short 15-30 second intervals, stirring often. Do not over cook. Stir in a teaspoon of canola oil or shortening to smooth out the candy.
-
Pour the melted candy melts into the face side of skull mold.
-
Spread out evenly, making sure you get all the way to the top and around the edges.
-
Gently tap on a hard surface to remove air bubbles. Transfer to a baking sheet to keep your skull level and place in the fridge for approximately 30 minutes to set.
-
Repeat the process with the remaining candy melts to create a second layer of candy melts.
-
Refrigerate for an additional 30 minutes or until fully set.
-
To remove your skull, gently pull all edges of the silicone mold away from the candy skull. Gently turn over on a flat surface and lift back the silicone all the way.
-
Heat up a large skillet on low to medium low heat. Place your skull face up on the skillet and watch it carefully. Remove it when your edges have become level. Turn your skull over and wipe along the top edge with a paper towel, or gloved hand to smooth it out. Store your skull in a gallon sized ziploc bag until you are ready to use.
How to Make Chocolate Spiders
-
In a small microwave safe bowl, melt approximately 1 cup of your favorite chocolate chips in short 15-30 second intervals, stirring often. Do not over cook chocolate.Using a spoon, carefully drop chocolate in plastic mold, carefully filling to the top but not overflowing. It helps to add to the center and gently push out to the edges, making sure to get all crevices. Gently tap the mold against a hard surface to remove air bubbles. If you have a lot of excess you can level the backs with the flat edge of metal spatula. Place in the refrigerator for about 15 minutes to fully harden before gently removing. Add edible shimmer dust if desired using an edible food brush.
-
You can leave these chocolate spiders as they are or you can add some sparkle with some edible dust shimmer powder. Repeat same process to make white skulls using white candy melts, an ice mold and black dust if desired.
How to Make Halloween Charcuterie Board
-
Place chocolate skull in center of the board.
-
Add your bigger items in various ways (small stacks, rows, build piles, etc) and any bowls/serving dishes around your centerpiece.
-
Place remaining treats, filling in any gaps with smallest items. Fill your serving dishes.
-
Add finishing touches such as small candies in various shapes and decor around the charcuterie board.
-
Add the chocolate spiders and chocolate skulls throughout the board and any finishing touches you'd like around the board before serving.
Recipe Notes
You can store your skull in the refrigerator if you prefer, especially if your kitchen is warm. If your charcuterie board doesn't have sides, it is recommended to build your dessert board where you plan to serve it.

I hope you love this Halloween themed charcuterie board as much I do!

